Craving something sweet but don’t want to pull out mixing bowls and baking pans?
I’ve got your back.
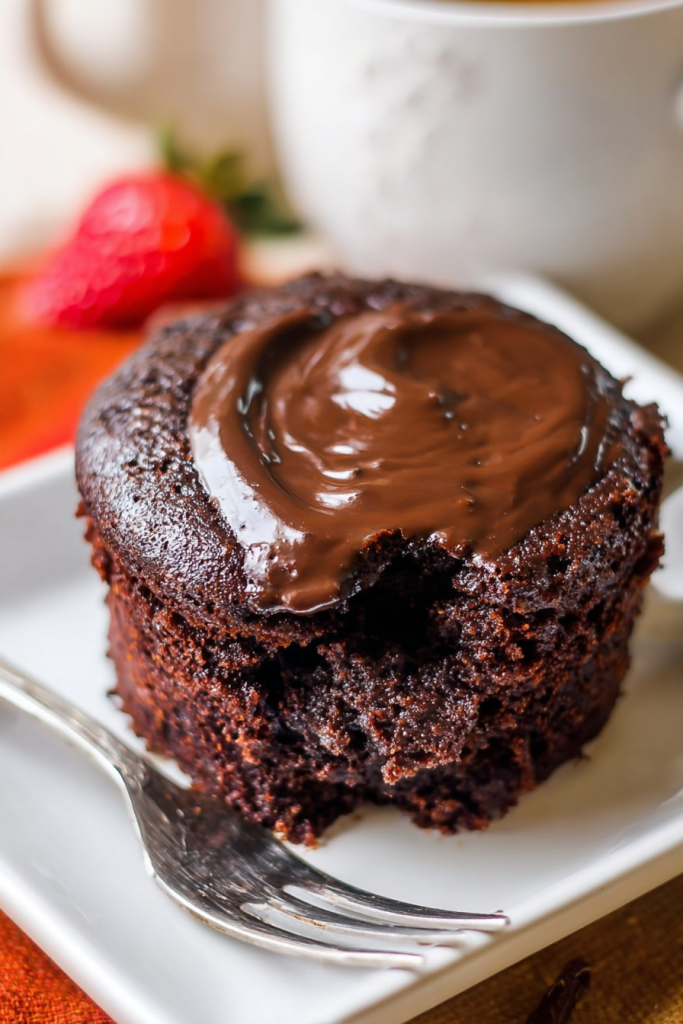
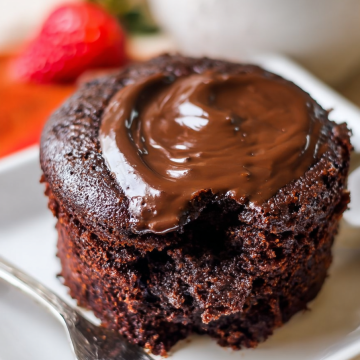
This chocolate mug cake delivers rich, chocolatey satisfaction in literally sixty seconds. No mixer required. No special equipment needed.
Just a mug, a spoon, and your microwave.
I know what you’re thinking.
Microwave cakes sound suspicious. I thought so too until I perfected this recipe.
After testing it dozens of times, I finally cracked the code.
The result?
A tender, moist chocolate cake that tastes like you actually tried.
Why this recipe works differently
Most mug cakes turn out rubbery or dry.
The secret culprit?
Eggs.
While eggs work great in traditional baking, they create a weird texture in microwave desserts. This recipe skips them entirely.
Instead, we’re using a perfect balance of cocoa powder, flour, and just enough fat. The combination creates an incredibly soft crumb.
The texture resembles a cross between cake and brownie. Rich without being heavy. Sweet without being cloying.
Made with ingredients you already have
Open your pantry right now.
I bet you have everything needed.
Cocoa powder? Check.
Flour? Probably sitting next to it.
Milk and vanilla extract? Already in your fridge.
This recipe uses standard baking staples. No exotic ingredients or special trips to specialty stores.
You can even prep the dry ingredients ahead. Mix them in small bags and store them in your cupboard.
When chocolate cravings hit, just grab a bag, add liquids, and microwave.
Instant dessert in under two minutes.
Perfect for late-night cravings
Picture this:
It’s 10 PM. You’re watching your favorite show.
Suddenly, you need chocolate immediately.
Traditional baking means preheating ovens and waiting forever. Store-bought desserts require pants and car keys.
This mug cake?
Pour, stir, microwave, done.
I’ve made this recipe countless times when friends come over unexpectedly. Everyone thinks I’m some kind of dessert wizard.
Little do they know it took me about ninety seconds.
Customize it your way
The base recipe is fantastic on its own.
But here’s where things get fun.
Want peanut butter chocolate? Swap the oil for nut butter.
Craving mint chocolate? Add a drop of peppermint extract.
Prefer darker chocolate flavor? Use all Dutch cocoa powder.
Want it sweeter? Increase the sweetener slightly.
I’ve experimented with countless variations. Each one turned out delicious. The recipe is incredibly forgiving.
You can top it with ice cream, whipped cream, or frosting. Or eat it plain straight from the mug.
Some nights I add chocolate chips before microwaving. They melt into gooey pockets of extra chocolate.
Other times I drizzle caramel sauce on top.
Sometimes I keep it simple with just powdered sugar.
Single serving means no temptation
Traditional cake recipes make eight servings minimum.
That’s dangerous territory for chocolate lovers like me.
This recipe solves that problem beautifully. It makes exactly one portion.
You satisfy your craving without baking an entire cake. No leftovers calling your name from the kitchen at midnight.
Perfect portion control without feeling deprived.
Just pure chocolate satisfaction when you want it.
Recipe Timing & Details
Prep Time: 3 minutes | Cook Time: 1 minute | Total Time: 4 minutes
Servings: 1 | Difficulty: Beginner-friendly
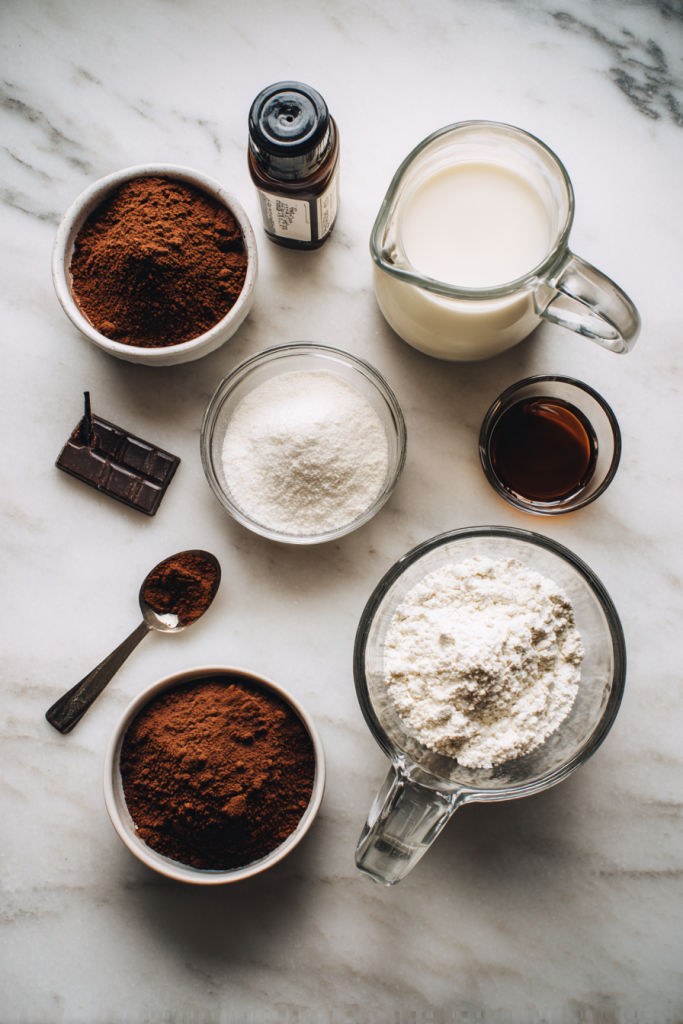
Ingredients
| Ingredient | Quantity | Notes |
|---|---|---|
| Cocoa powder (regular unsweetened) | 1 tbsp | Creates base chocolate flavor |
| Dutch cocoa powder | 2 tsp | Can substitute with regular cocoa |
| Flour | 3 tbsp | Spelt, white, oat, or gluten-free work |
| Salt | 1/8 tsp | Enhances chocolate flavor |
| Sweetener | 2 tbsp | Sugar, maple syrup, or honey |
| Baking powder | 1/4 tsp | Creates light, fluffy texture |
| Oil or nut butter | 2 1/2 tsp | Can substitute applesauce or banana |
| Milk | 3 tbsp | Any variety works perfectly |
| Pure vanilla extract | 1/2 tsp | Rounds out chocolate flavor |
Step-by-step instructions
Step One: Prep your workspace
Grab a small mixing bowl or cereal bowl.
You’ll need a fork or small whisk for mixing.
Choose your serving vessel now. A coffee mug works great. So does a small ramekin.
If you plan to flip the cake out later, spray your mug with cooking spray first.
This prevents sticking.
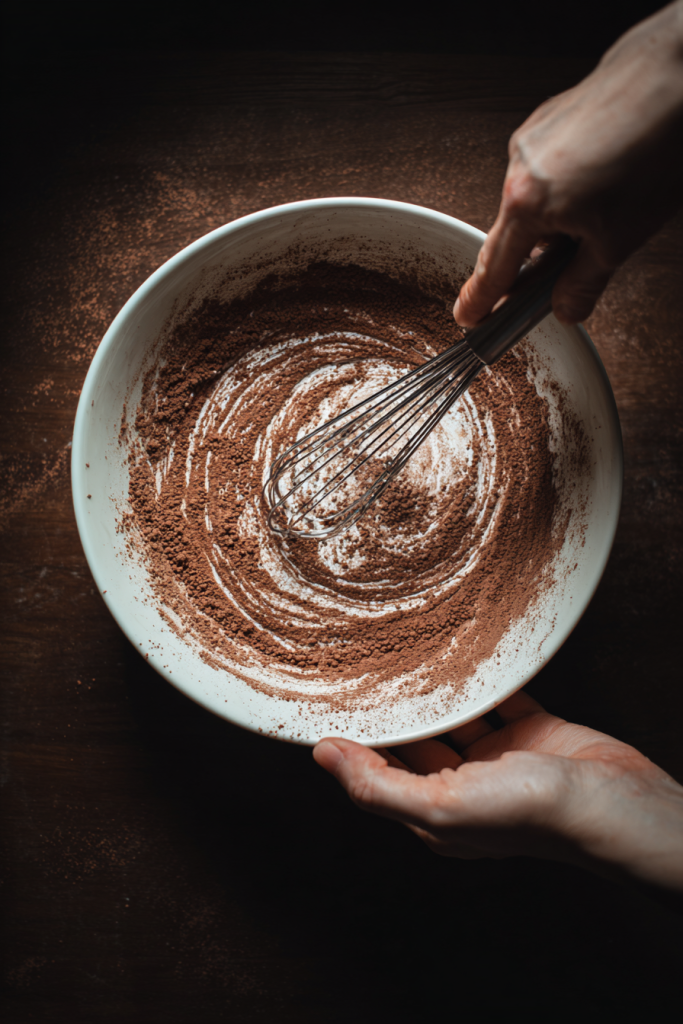
Step Two: Mix dry ingredients thoroughly
Add both cocoa powders to your mixing bowl.
Measure carefully for best results.
Spoon in the flour next. Don’t pack it down when measuring.
Sprinkle in the salt and baking powder. These seem like tiny amounts but they’re crucial.
Add your sweetener of choice. Granulated sugar works wonderfully here.

Now whisk everything together vigorously.
Take thirty seconds to really blend it well.
Getting the dry ingredients evenly mixed prevents lumps. It also distributes the leavening agent properly.
Step Three: Add wet ingredients
Pour in your milk slowly while stirring.
Any milk type works here.
I’ve used dairy milk, almond milk, oat milk, and coconut milk. All turned out perfectly.
Drizzle in the oil next. You can substitute melted coconut oil if you prefer.
Many readers swap this for applesauce or mashed banana. The cake becomes slightly denser but still delicious.
Add the vanilla extract last.
This ingredient makes everything taste better.
Stir the batter until completely smooth. No flour streaks should remain visible.
The consistency should resemble thin brownie batter. It will look slightly runny.
Step Four: Transfer and cook
Pour your batter into the prepared mug.
Don’t fill it more than halfway full.
The cake rises significantly during cooking. Leaving room prevents overflow disasters.
For microwave cooking, place the mug in the center. Cook on high power for thirty seconds initially.
Check the cake.
It should look mostly set but slightly shiny on top.
If needed, cook in additional ten-second bursts. My microwave needs about fifty seconds total.
Different microwaves vary in power. Start conservative and add time as needed.
The cake continues cooking after you stop the microwave.
Let it rest one minute before eating.
Oven alternative method
Prefer using your oven?
Preheat it to 350°F first.
Pour the batter into an oven-safe ramekin. Bake for twelve to fourteen minutes.
Test doneness with a toothpick. It should come out with just a few moist crumbs.
The oven method takes longer but produces slightly more even cooking.
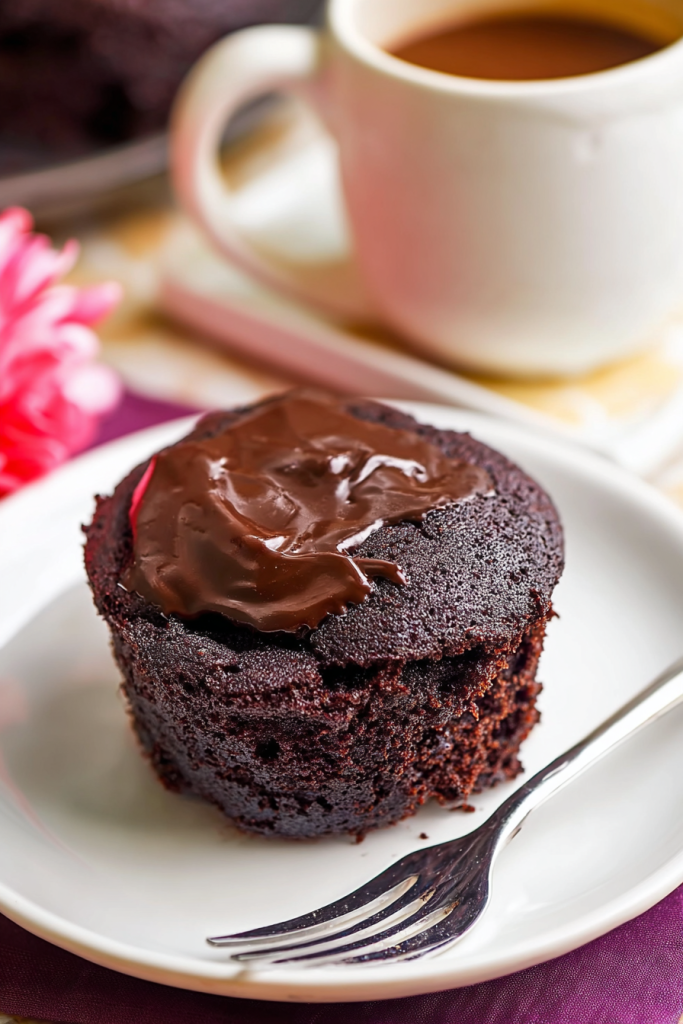
Step Five: Add toppings and enjoy
Let the cake cool for two minutes if you can wait.
I usually can’t.
Top it however your heart desires. Whipped cream is classic.
Ice cream melts beautifully into the warm cake. Chocolate chips add extra richness.
Fresh berries provide a nice contrast. Caramel sauce creates decadent drizzles.
Some nights I eat it plain with just a fork.
It’s perfect exactly as is.
Storage tips
This cake tastes best fresh from the microwave.
The texture changes as it cools completely.
If you somehow have leftovers, cover the mug with plastic wrap. Store it in the fridge up to two days.
Reheat for fifteen seconds before eating.
It won’t be quite as fluffy but still tastes good.
Flavor variations to try
Peanut Butter Chocolate
Skip the oil completely.
Stir in two tablespoons of creamy peanut butter instead.
The result tastes like a peanut butter cup.
Mocha Magic
Add half a teaspoon of instant coffee granules to the dry ingredients.
Coffee enhances chocolate flavor dramatically.
Mint Chocolate Delight
Mix in a quarter teaspoon of peppermint extract with the wet ingredients.
Top with crushed peppermint candies if desired.
Orange Chocolate Dream
Add one teaspoon of fresh orange zest before mixing.
The citrus brightens the chocolate beautifully.
Double Chocolate Explosion
Fold in a tablespoon of chocolate chips after mixing the batter.
They create melty pockets of extra chocolate.
Troubleshooting common issues
Here’s what to do when things don’t go as planned:
Cake turned out rubbery?
You likely overcooked it. Reduce microwave time by ten seconds next attempt.
Texture seems dry?
Add an extra half tablespoon of milk to the batter. Also ensure you’re not overmixing.
Didn’t rise properly?
Check your baking powder freshness. Old leavening agents lose effectiveness.
Overflowed in microwave?
Your mug was too small or too full. Use a larger vessel next time.
Frequently Asked Questions
Can I make this without a microwave?
Absolutely.
Use the oven method detailed above. Bake at 350°F for twelve to fourteen minutes in an oven-safe ramekin.
What’s the best flour substitute for gluten-free diets?
All-purpose gluten-free flour blends work perfectly.
Oat flour is another excellent option.
Just use the same measurement as regular flour.
Can I prepare the dry ingredients ahead?
Yes!
Mix all dry ingredients and store them in small zip-top bags.
When craving strikes, just add the wet ingredients. It’s like having instant cake mix ready.
How do I prevent the cake from sticking?
Spray your mug generously with cooking spray before adding batter.
If you forgot, let the cake cool five minutes. It releases easier when slightly cooled.
Can I double this recipe?
You can, but use a larger mug or divide between two regular mugs.
Increase cooking time by fifteen to twenty seconds.
Watch carefully to prevent overcooking.
Final thoughts
This chocolate mug cake has become my go-to emergency dessert.
It satisfies chocolate cravings instantly without derailing healthy eating plans.
The single serving size means no temptation to overindulge. Just pure chocolate satisfaction when you want it most.
Keep the dry ingredients premixed in your pantry.
Late-night chocolate emergencies will never catch you unprepared again.
Now grab a mug and make yourself some magic.
You’re only sixty seconds away from chocolate heaven.
60-Second Chocolate Mug Cake
Ingredients
- 1 tbsp cocoa powder regular unsweetened
- 2 tsp Dutch cocoa powder can substitute with regular cocoa
- 3 tbsp flour spelt, white, oat, or gluten-free
- 1/8 tsp salt
- 2 tbsp sweetener sugar, maple syrup, or honey
- 1/4 tsp baking powder
- 2 1/2 tsp oil or nut butter can substitute applesauce or banana
- 3 tbsp milk any variety works
- 1/2 tsp pure vanilla extract
Instructions
- Grab a small mixing bowl or cereal bowl. Choose your serving mug – a coffee mug or small ramekin works great. If you plan to flip the cake out later, spray your mug with cooking spray first.
- Add both cocoa powders to your mixing bowl. Spoon in the flour without packing it down. Add salt, baking powder, and sweetener. Whisk everything together vigorously for 30 seconds to blend well and prevent lumps.
- Pour in milk slowly while stirring. Drizzle in the oil (or substitute with melted coconut oil, applesauce, or mashed banana). Add vanilla extract last. Stir the batter until completely smooth with no flour streaks. The consistency should resemble thin brownie batter.
- Pour batter into the prepared mug, filling no more than halfway full. Place mug in center of microwave and cook on high power for 30 seconds initially. Check the cake – it should look mostly set but slightly shiny on top. If needed, cook in additional 10-second bursts until done (about 50 seconds total). Let rest for 1 minute before eating.
- Oven Alternative: Preheat oven to 350°F. Pour batter into oven-safe ramekin and bake for 12-14 minutes. Test doneness with a toothpick – it should come out with just a few moist crumbs.
- Let cake cool for 2 minutes. Top with whipped cream, ice cream, chocolate chips, fresh berries, caramel sauce, or enjoy plain. Serve immediately for best texture.
Notes
- Peanut Butter Chocolate: Replace oil with 2 tbsp creamy peanut butter
- Mocha: Add 1/2 tsp instant coffee granules to dry ingredients
- Mint Chocolate: Add 1/4 tsp peppermint extract with wet ingredients
- Orange Chocolate: Add 1 tsp fresh orange zest before mixing
- Double Chocolate: Fold in 1 tbsp chocolate chips after mixing batter
- Rubbery texture: Reduce microwave time by 10 seconds
- Dry texture: Add extra 1/2 tbsp milk, don’t overmix
- Didn’t rise: Check baking powder freshness
- Overflowed: Use larger mug or fill less full