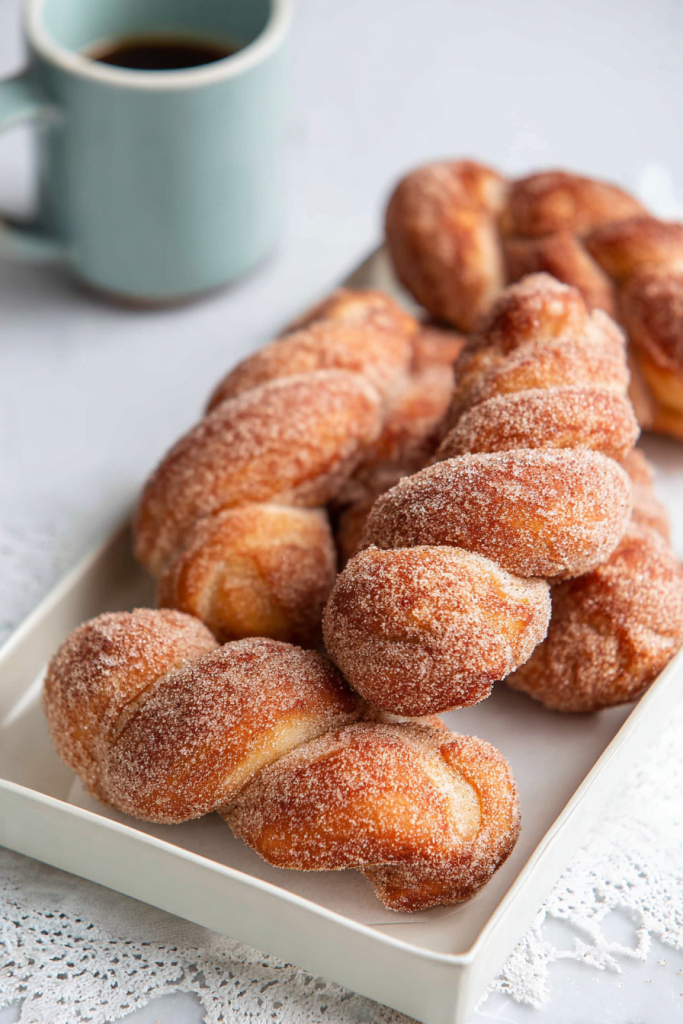
You know that moment when you bite into a freshly fried doughnut?
The crispy outside cracks open. Soft, pillowy dough hugs your taste buds. Sweet cinnamon wraps everything together like a warm blanket.
That’s what we’re making today.
I used to stare at those gorgeous braided doughnuts in Asian bakeries. Those golden spirals with their sugar-crusted edges looked impossible to recreate at home. Like, seriously intimidating.
But here’s the thing…
After messing around in my kitchen for a few weekends, I figured it out. The secret? It’s not some fancy technique. It’s just patience and knowing how to twist the dough properly.
Recipe Timing:
Prep Time: 30 minutes | Rising Time: 40 minutes | Cook Time: 15 minutes | Total Time: 1 hour 25 minutes
Servings: 12 doughnut twists | Difficulty: Intermediate
Why This Recipe Actually Works
Here’s what I love about these twisted doughnuts.
No special cutters needed. No weird equipment. You shape everything with your hands.
The dough gets enriched with butter and milk. That’s what creates the tender, melt-in-your-mouth crumb. When you twist the ropes, you’re actually creating tiny air pockets throughout. These pockets expand when the doughnuts hit hot oil.
Result?
Incredibly light texture.
The twisted shape does something magical too. It creates way more surface area than regular ring doughnuts. So you get extra crispy edges right next to those soft, fluffy centers.
Think of it like this: imagine the best parts of a churro had a baby with a classic glazed doughnut. That’s what we’re talking about.
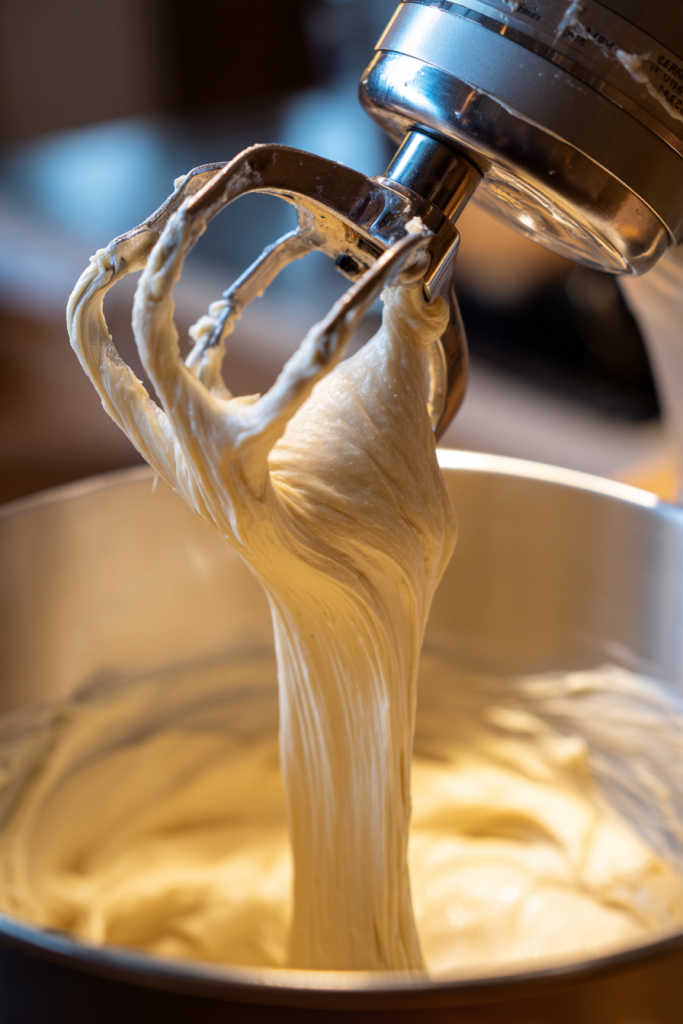
I always use my stand mixer for this. The dough hook does all the hard work while I stand there looking accomplished.
But listen…
If you don’t have a mixer, don’t worry. Making this by hand is totally doable. Just plan on kneading for about ten minutes. Your arms will get a workout, but your doughnuts will still turn out amazing.
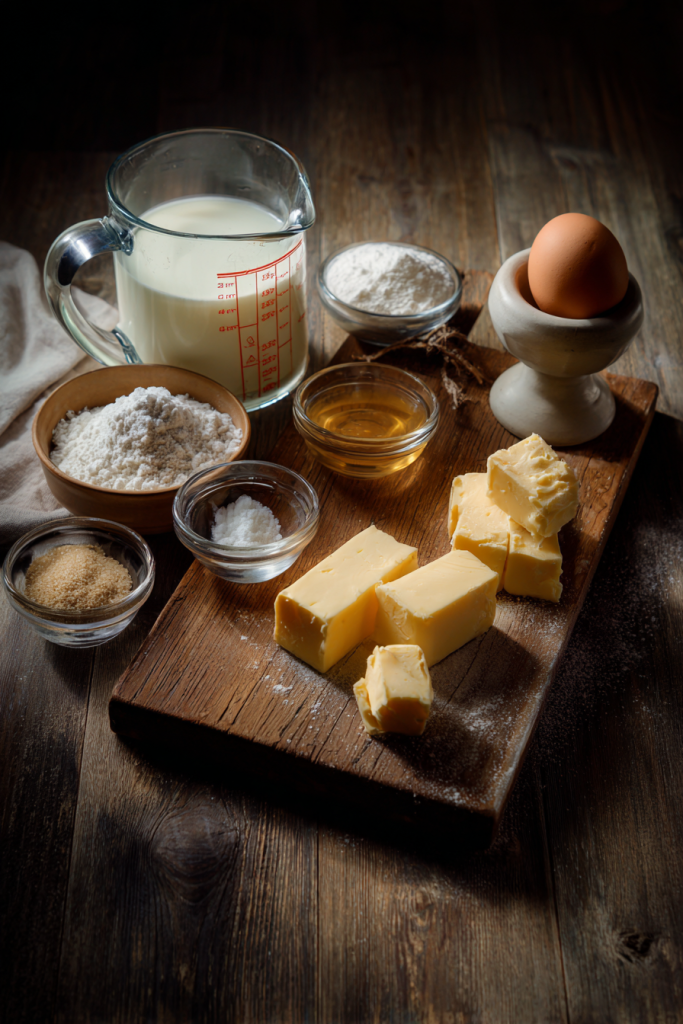
Let’s Talk Ingredients
Here’s everything you need:
Complete Ingredients Table
| Ingredient | Quantity | Notes |
|---|---|---|
| Whole milk | 1½ cups | Warmed to 110°F for yeast activation |
| Active dry yeast | 1 tablespoon | Can substitute with instant yeast |
| Granulated sugar (dough) | 3 tablespoons (38g) | Feeds the yeast, adds subtle sweetness |
| Large egg | 1 | Room temperature for better incorporation |
| All-purpose flour | 4 cups (520g) | Provides structure and chewiness |
| Kosher salt | 2 teaspoons | Enhances overall flavor balance |
| Unsalted butter | 6 tablespoons (84g) | Softened to room temperature |
| Vegetable oil | For frying | Choose neutral-flavored oil with high smoke point |
| Granulated sugar (coating) | ½ cup (100g) | For the cinnamon sugar mixture |
| Ground cinnamon | 1½ teaspoons | Adjust to taste preference |
The Temperature Thing
Milk temperature matters. Like, really matters.
Too hot? You’ll murder the yeast cultures.
Too cold? You’ll be waiting forever for anything to happen.
I keep an instant-read thermometer in my drawer specifically for this. That perfect 110°F mark is your target. Hit it every time.
About That Butter
Room temperature butter is your friend here.
I set mine out about an hour before I start baking. You want it soft enough to yield when you press it gently, but not melting into a puddle on your counter.
When butter’s at the right temp, it blends smoothly into the dough. No greasy clumps. No weird chunks that refuse to mix in.
Picking Your Frying Oil
Vegetable oil or canola oil work best.
Why?
They’re neutral. They won’t make your doughnuts taste like the last thing you fried. Plus, they have high smoke points, which means they can handle 350°F without breaking down and getting funky.
Making the Dough (This Is Where It Gets Real)
Step 1: Wake Up That Yeast
I dump warm milk, yeast, and sugar into my stand mixer bowl.
Then I wait.
Five minutes.
During this time, the yeast wakes up. You’ll see tiny bubbles forming across the surface. It’s like watching a science experiment in your kitchen.
But here’s the deal…
If ten minutes pass and you see nothing? Your yeast is probably dead. Check the expiration date. Toss it. Start over with fresh yeast. Trust me, it’s not worth pushing forward with dead yeast.
Once the yeast blooms, I whisk in the egg. Keep whisking until you don’t see any streaky egg whites floating around anymore.
Step 2: Building the Foundation
Grab a separate bowl.
Whisk together your flour and salt. This step matters because you want that salt evenly distributed. If you skip this, you’ll get bites that taste super salty right next to bites that taste bland.
Nobody wants that.
Now attach your dough hook. Mixer on low.
Add one-third of the flour mixture. The dough looks shaggy and messy at first. That’s completely normal. Don’t panic.
Once things start clumping together, add the second third of flour.
Here comes the butter part…
Add it one tablespoon at a time.
I know. It feels slow. But wait for each piece to disappear before adding the next one. This gradual approach keeps the dough from getting greasy and weird.
The mixture will look sticky and kind of ugly right now. Resist every urge to dump in more flour. Just trust the process.
Add that final third of flour. Bump the mixer speed to medium.
Watch what happens over the next three to five minutes. The dough transforms. It pulls away from the bowl sides. Develops this smooth, satiny look that’s gorgeous.
Step 3: The Waiting Game
Transfer your dough to a greased bowl.
Give the dough surface a light coating of oil too. This prevents that annoying dry skin from forming on top. Cover it with plastic wrap or a clean kitchen towel.
Now… we wait.
Room temperature makes a difference here. My kitchen sits around 72°F most days. The dough usually doubles in about thirty-five minutes.
Got a cooler kitchen?
You might need the full forty-five minutes. Just watch for that visible doubling in volume.
Shaping These Beauties
This is the fun part.
Press down gently on your risen dough. You’re releasing all those trapped gases. On a lightly floured surface, divide the dough into twelve equal portions.
A digital scale helps here. But if you’re good at eyeballing portions, go for it.
Cover those divided portions with a kitchen towel while you work. Dough dries out fast when it’s exposed to air. Dried-out dough is harder to shape and doesn’t fry as nicely.
The Twisting Technique (Pay Attention Here)
Take one portion.
Roll it between your palms and the work surface. You’re going for a fourteen-inch rope. Keep the thickness even throughout. No thin spots. No thick middles.
Ready for the twist?
Put both hands at the rope ends.
Right hand rolls forward.
Left hand rolls backward.
At the same time.
This creates tension along the entire length. You’ll actually feel the dough resisting slightly. That’s good. That tension is what makes the magic happen.
Now lift the rope by both ends.
Bring them together.
Watch what happens…
The built-up tension makes the dough spiral naturally. It’s almost like the dough wants to twist itself. I usually give it one or two more deliberate twists for a tighter braid pattern.
Pinch the ends together. Firmly.
This seam is what keeps everything from unraveling when you fry them. Place the twist on a parchment-lined baking sheet.
Repeat with the remaining portions. Keep those finished twists loosely covered.

Let everything rest for eight to ten minutes. The gluten needs to relax after all that shaping.
Meanwhile, let’s set up for frying.
Frying Time (Don’t Skip This Part)
Attach a candy thermometer to your heavy-bottomed pot. I use a Dutch oven, but any thick pot works.
Fill it with two to three inches of oil. Set it over medium heat.
The oil needs to hit exactly 350°F before any doughnuts go in.
This temperature isn’t negotiable.
Lower? Your doughnuts absorb too much oil and get greasy.
Higher? The outside burns before the inside cooks.
Carefully slide two or three twists into the hot oil. Don’t crowd the pot. Each twist needs space to float and flip around freely.
Set a timer for ninety-five seconds.
Watch that gorgeous golden-brown color develop. Use a spider strainer or slotted spoon to flip each twist gently.
Another ninety-five seconds on the second side, and you’re done.
Transfer the finished doughnuts to a paper towel-lined baking sheet. The paper soaks up excess oil right away.
Here’s something crucial:
The oil temperature changes with each batch. When you add cold dough, the temperature drops.
I keep my eyes glued to that thermometer. Constantly adjusting the heat to maintain 350°F.
This attention to detail? It’s what separates okay doughnuts from incredible doughnuts.
The Sugar Coating
While your last batch drains, mix cinnamon and sugar in a shallow dish.
The ratio matters. One and a half teaspoons cinnamon to half cup sugar gives you pronounced cinnamon flavor without being overwhelming.
Timing is key for coating.
The doughnuts need to be warm. But not scorching hot.
Too hot? The sugar melts into a syrupy mess.
Too cool? The coating won’t stick.
Toss each doughnut in the cinnamon sugar mixture. Make sure you get complete coverage. Those twisted grooves and ridges catch extra coating, which is exactly what you want.

Want to Mix Things Up?
Cinnamon sugar is classic. But you don’t have to stop there.
Powdered sugar creates that elegant, snow-covered look. Dust it on while the doughnuts are still warm.
Cardamom sugar adds this aromatic, slightly floral thing. Mix one teaspoon ground cardamom with half cup sugar. Sophisticated. Unexpected. Delicious.
Vanilla bean sugar delivers pure vanilla flavor. Split a vanilla bean, scrape out those tiny black seeds, mix with sugar. The specks look gorgeous against the golden dough.
Cocoa cinnamon sugar is for chocolate people. Add two tablespoons unsweetened cocoa powder to your regular cinnamon sugar mix.
Nutmeg sugar gives you warm, nutty undertones. Use freshly grated nutmeg for the best smell and taste.
For special occasions?
I drizzle cooled doughnuts with simple glaze. Mix powdered sugar with milk until it’s pourable. Drizzle decoratively across those twists. Beautiful.
Tips That’ll Save Your Batch
Temperature control is everything.
Get yourself an instant-read thermometer. Get a candy thermometer. These tools eliminate all the guesswork. Worth every penny.
Don’t rush the rises.
Yeast needs time. Underproofed dough makes dense, heavy doughnuts. Nobody wants that.
Seal those twist ends.
Pinch them together firmly. Loose ends unravel when they hit hot oil. You’ll end up with wonky shapes instead of beautiful spirals.
Work in batches.
I know you’re excited. But crowding the pot drops the temperature. You get uneven cooking. Patience pays off here.
Use fresh yeast.
Check that expiration date before you start. Expired yeast won’t activate. You’ll waste all your ingredients.
Keep everything covered.
Exposed dough develops a dry skin. That skin affects texture. Cover your bowls. Cover your shaped doughnuts. Just keep everything covered.
Storing and Reheating
These doughnuts taste incredible fresh from the fryer.
That contrast between crispy outside and fluffy inside? Peak perfection right there.
But life happens.
Sometimes you need to store them.
Keep leftovers in an airtight container at room temperature. They’ll stay decent for about twenty-four hours. After that, the texture goes downhill fast.
Reheating the Right Way
Skip the microwave.
Seriously. Microwaves make the coating soggy and the texture rubbery.
Instead, put doughnuts on a baking sheet. Stick them in a 300°F oven for about five minutes. This method brings back some of that original crispiness.
Can You Freeze Them?
You can. But I’ll be honest…
The texture never quite recovers fully.
If you must freeze, do it before adding the sugar coating. Freeze in a single layer on a baking sheet. Once they’re solid, transfer to freezer bags.
Thaw at room temperature. Reheat in the oven. Then add your coating.
When Things Go Wrong
Dense, heavy doughnuts?
Your dough didn’t rise enough. Give it more time. Maybe move it to a warmer spot in your kitchen.
Greasy, oil-soaked mess?
Frying temperature was too low. Get a thermometer. Use it every time.
Burnt outside, raw inside?
Oil temperature was too high. Lower your heat. Keep it steady at 350°F.
Twists unraveling?
You didn’t seal the ends well enough. Pinch them together more firmly next time.
Dough too sticky?
This is actually normal after the first rise. Don’t add more flour. Just use lightly floured surfaces and work with confidence.
Questions You’re Probably Asking
Can I use instant yeast instead of active dry yeast?
Yes!
They work the same in this recipe. The main difference is that instant yeast doesn’t need that initial five-minute blooming time. You can add it straight to the flour mixture.
But here’s what I do…
I still mix it with the warm milk first. It ensures even distribution throughout the dough.
What if I don’t have a stand mixer?
No problem.
Make this dough by hand. Mix everything in a large bowl until it comes together. Dump it onto a clean work surface. Knead hard for ten to twelve minutes.
You want smooth, elastic dough that springs back when you poke it.
Your arms will get tired. But the doughnuts? Just as delicious.
How do I know the oil is hot enough without a thermometer?
I really, really recommend getting a thermometer.
But if you absolutely can’t…
Drop a small bread cube into the oil. It should sizzle immediately and turn golden brown within sixty seconds.
Browns faster? Oil’s too hot.
Barely sizzles? Heat needs to go up.
Can I bake these instead of frying?
You can. But they’ll be different.
Fried doughnuts have that crispy outside and tender inside that baking just can’t match.
If you must bake, brush the shaped twists with melted butter. Put them on a parchment-lined baking sheet. Bake at 375°F for twelve to fifteen minutes until golden.
They’ll taste more like sweet bread rolls than doughnuts.
Why didn’t my yeast activate?
Could be a few things.
First, check your yeast packet’s expiration date. Dead yeast won’t work. Period.
Second, check your milk temperature. Too hot kills yeast. Too cold prevents activation.
Third, make sure you added sugar to the yeast mixture. Yeast feeds on sugar to become active.
If nothing happens after fifteen minutes? Toss it. Start over with fresh yeast.
These twisted doughnuts bring bakery-quality results straight from your home kitchen. The process takes time and attention. But the reward? Absolutely worth it.
There’s something special about serving warm, homemade doughnuts to the people you care about. The smiles you’ll get make every minute worthwhile.
Now get in that kitchen and start twisting.
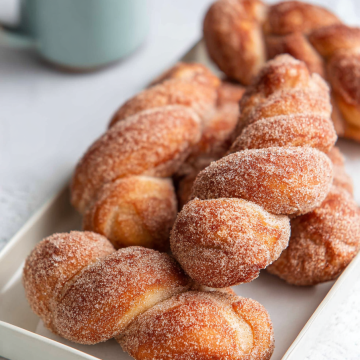
Twisted Doughnuts with Cinnamon Sugar
Ingredients
Dough
- 1.5 cups whole milk warmed to 110°F
- 1 tablespoon active dry yeast can substitute with instant yeast
- 3 tablespoons granulated sugar 38g
- 1 large egg room temperature
- 4 cups all-purpose flour 520g
- 2 teaspoons kosher salt
- 6 tablespoons unsalted butter softened to room temperature, 84g
- vegetable oil for frying
Cinnamon Sugar Coating
- 0.5 cup granulated sugar 100g
- 1.5 teaspoons ground cinnamon adjust to taste
Instructions
- In a stand mixer bowl, combine warm milk (110°F), yeast, and 3 tablespoons sugar. Let sit for 5 minutes until the mixture becomes foamy and bubbles form on the surface. This means the yeast is activated.
- Whisk the egg into the yeast mixture until fully incorporated with no streaky egg whites visible.
- In a separate bowl, whisk together flour and salt to ensure even distribution.
- Attach the dough hook to your stand mixer. With mixer on low speed, add one-third of the flour mixture. Once it starts clumping together, add the second third of flour.
- Add the softened butter one tablespoon at a time, waiting for each piece to fully incorporate before adding the next.
- Add the final third of flour. Increase mixer speed to medium and knead for 3-5 minutes until the dough pulls away from the bowl sides and develops a smooth, satiny appearance.
- Transfer dough to a greased bowl and lightly coat the surface with oil. Cover with plastic wrap or a clean kitchen towel. Let rise at room temperature for 35-45 minutes, or until doubled in size.
- Gently press down the risen dough to release gases. Divide into 12 equal portions on a lightly floured surface. Cover portions with a kitchen towel while working.
- Take one portion and roll it between your palms and the work surface into a 14-inch rope with even thickness throughout.
- Hold both ends of the rope. Roll your right hand forward and left hand backward simultaneously to create tension. Lift the rope by both ends and bring them together – the dough will naturally spiral. Give it 1-2 more deliberate twists for a tighter braid. Pinch the ends together firmly.
- Place twisted doughnuts on a parchment-lined baking sheet and cover loosely. Let rest for 8-10 minutes.
- Attach a candy thermometer to a heavy-bottomed pot or Dutch oven. Fill with 2-3 inches of vegetable oil. Heat over medium heat to exactly 350°F.
- Carefully slide 2-3 twists into the hot oil without crowding. Fry for 95 seconds, then flip gently with a spider strainer or slotted spoon. Fry for another 95 seconds until golden brown.
- Transfer fried doughnuts to a paper towel-lined baking sheet to drain. Monitor and adjust heat between batches to maintain 350°F oil temperature.
- Mix cinnamon and ½ cup sugar in a shallow dish. While doughnuts are still warm (but not scorching hot), toss each one in the cinnamon sugar mixture until completely coated.