You know that feeling when bread is baking and your whole house smells like heaven?
That’s what happens every time I make this Amish Apple Fritter Bread.
I stumbled across this recipe about five years ago during a fall farmers market visit. An elderly woman was selling loaves wrapped in brown paper. One bite and I was hooked. I begged her for the recipe (she made me promise to share it with others – so here we are).
Here’s what I love most.
No fancy equipment. No complicated steps. Just apples, stuff from your pantry, and about an hour.
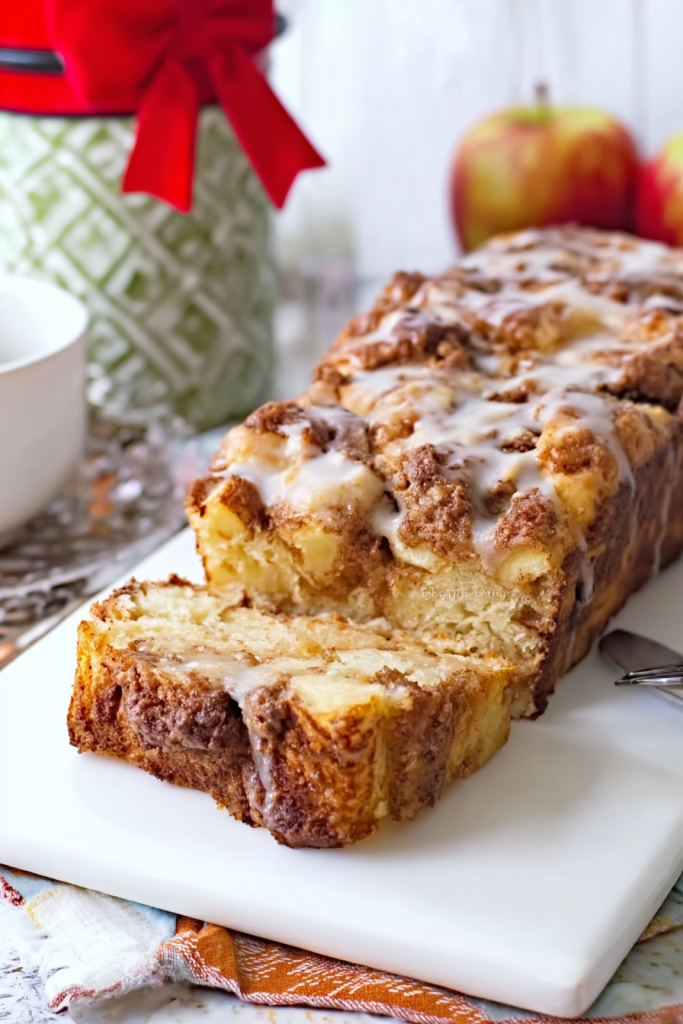
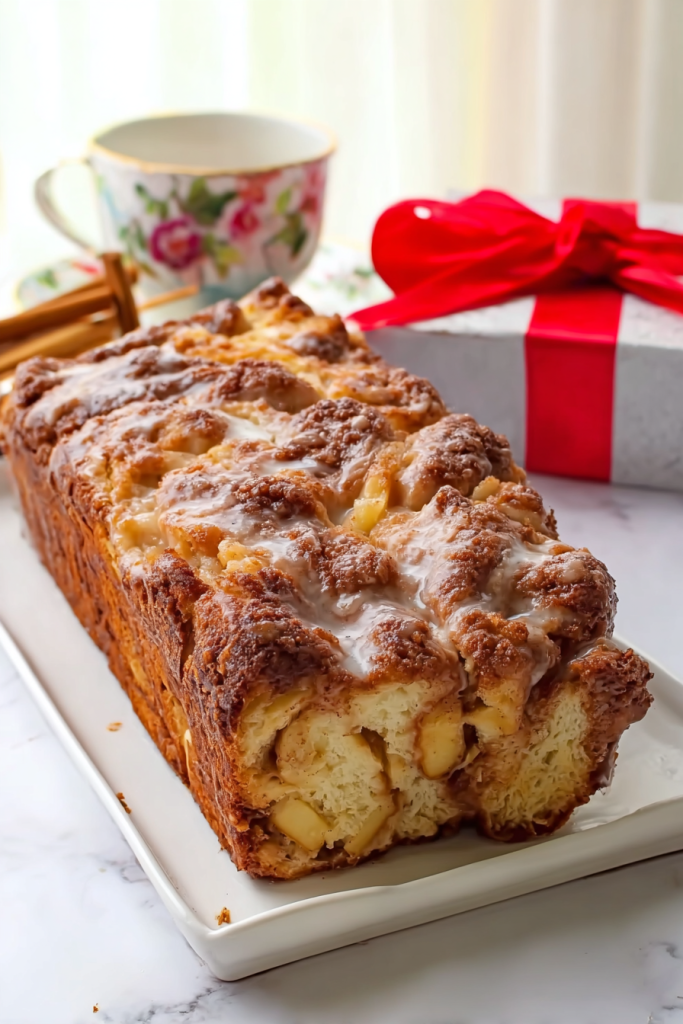
What you get is magic. A tender loaf with ribbons of cinnamon-sugar apples running through it. Topped with a sweet glaze that makes everything better.
Each slice? Pure comfort food.
Perfect for lazy Sunday mornings. Great with afternoon coffee. And honestly? It makes people think you’re a way better baker than you actually are.
Why This Bread is Different
I’ve made a lot of quick breads.
Banana bread. Zucchini bread. Pumpkin bread. You name it.
But this one? It’s in its own category.
Most apple breads just toss chopped fruit into batter and call it a day. Not this one. This recipe creates layers. Actual pockets of sweet, cinnamon-coated apples scattered throughout.
The texture is ridiculously soft. Almost cake-like, but not quite.
When you slice into it, you see these beautiful swirls of brown sugar and cinnamon. The glaze on top adds sweetness without being too much (because let’s be honest, some glazes are just sugar overload).
I’ve served this bread at least twenty different ways:
- Warm for breakfast with real butter melting into it
- Sliced for afternoon snacks when friends drop by
- Wrapped in parchment paper as holiday gifts (everyone asks for the recipe)
Last Christmas, I made seven loaves. Seven. They all disappeared within 48 hours.
Recipe Quick Facts
Let me break down the basics for you:
| Detail | Info |
|---|---|
| Prep Time | 20 minutes |
| Bake Time | 60 minutes |
| Total Time | 1 hour 20 minutes |
| Servings | 8 generous slices |
| Difficulty | Easy (seriously, beginners can nail this) |
What You’ll Need
Good news?
You probably have most of this stuff already.
I raided my pantry and found almost everything. Only had to grab fresh apples from the store.
Here’s your shopping list:
| Ingredient | Amount | Quick Notes |
|---|---|---|
| Brown sugar | 1/3 cup | Light or dark – doesn’t matter |
| Ground cinnamon | 1 teaspoon | For that topping |
| Butter | 1/2 cup (1 stick) | Must be softened |
| Granulated sugar | 2/3 cup + 1 tablespoon | We’ll split this up |
| Eggs | 2 large | Room temp works better |
| Vanilla extract | 2 teaspoons | Real vanilla, not imitation |
| All-purpose flour | 1 1/2 cups | Spoon it in, don’t pack |
| Baking powder | 2 teaspoons | Check if it’s still fresh |
| Milk | 1/2 cup + 1 tablespoon | Whole milk is best |
| Apples | 2 cups chopped | We’ll talk apple types below |
| Powdered sugar | 1/2 cup | For the glaze |

Let’s Talk Apples
This is important.
Not all apples are created equal when it comes to baking.
My favorite? Granny Smith.
They’re tart. They hold their shape. They don’t turn into applesauce when you bake them. That tartness balances out all the sugar in this recipe perfectly.
Honeycrisp is my second choice. They’ve got great texture and stay firm.
What to avoid:
- Red Delicious (they get mushy)
- McIntosh (same problem – too soft)
Gala and Fuji work okay if that’s what you’ve got. They’re a bit sweeter but still hold up fine.
Chopping tip: Cut your apples into chunks about half an inch. Not too big, not too small. You want them to distribute evenly through the bread.
I learned this the hard way. First time I made this, I used huge apple chunks. They created weird air pockets and the bread fell apart when I sliced it.
Live and learn, right?
Kitchen Tools You’ll Need
Nothing fancy here.
Seriously. If you can make boxed brownies, you have everything you need.
Must-haves:
- One loaf pan (8.5 x 4.5 x 2.5 inches is ideal)
- Electric mixer (or strong arms and a wooden spoon)
- A few mixing bowls (I use three)
- Measuring cups and spoons
- Whisk
- Spatula
That’s it.
I grease my pan with cooking spray. Works perfectly every time. None of that fancy butter-and-flour nonsense.
The electric mixer helps with creaming butter and sugar. But honestly? I’ve made this by hand before when my mixer died. Just takes more elbow grease and about 3 extra minutes of stirring.
Set up all your bowls before you start. It makes everything flow smoother. No scrambling to find a clean bowl when your hands are covered in batter.
Let’s Make This Bread
Alright. Roll up your sleeves.
Time to bake.
Step 1: Get Your Oven Ready
Turn that oven to 350°F.
Don’t skip preheating. I know it’s tempting to throw the pan in early. But trust me – proper preheating makes a difference. You get even baking and that perfect golden top.
While it heats, grab your loaf pan and spray it down really well with cooking spray. Get the corners. Get the sides. Get everything.
Nothing worse than bread stuck to the pan. Nothing.
Now here’s a little trick I picked up from my French cooking class years ago. It’s called “mise en place.” Fancy term for “get your stuff together before you start.”
Measure everything. Set it all out.
This prevents that moment where you’re mixing and realize you’re out of baking powder.
Step 2: Make Your Cinnamon-Sugar Topping
Grab a small bowl.
Toss in that 1/3 cup brown sugar and 1 teaspoon cinnamon.
Whisk it together. Make sure there aren’t any lumps. Set it aside.
This might seem like a small thing. But this topping? It’s what creates that incredible caramelized crust on top. When it bakes, the brown sugar melts just slightly and forms these sweet, crispy pockets.
Don’t skip it.
I did once because I was lazy. The bread was good but missing that special something.
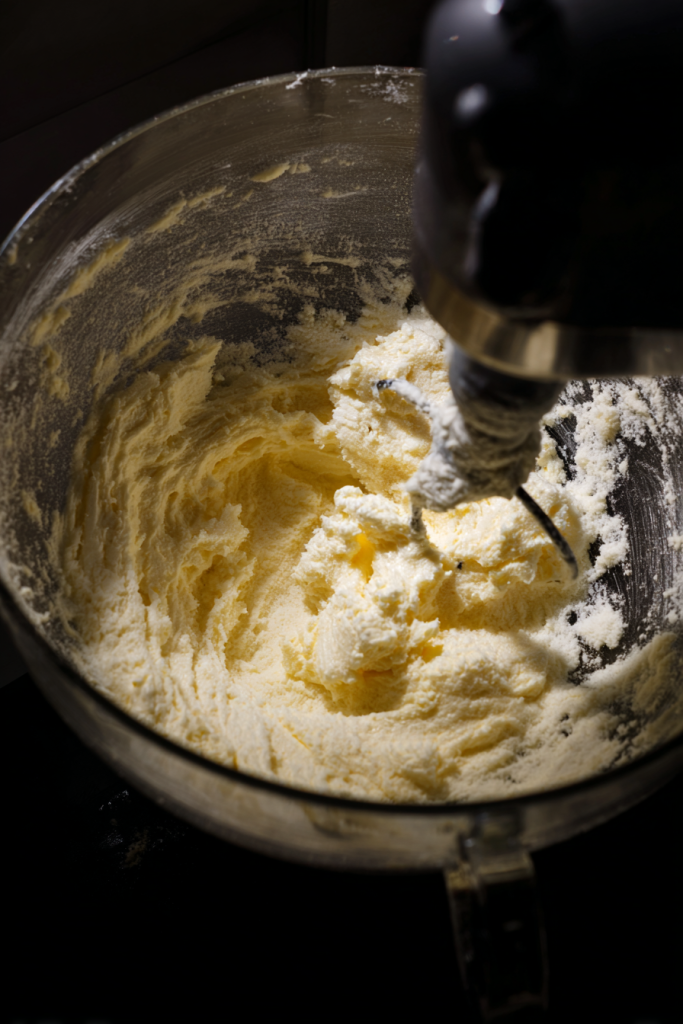
Step 3: Cream That Butter and Sugar
This is where things get real.
Put your softened butter in your big mixing bowl. Add the 2/3 cup granulated sugar.
Beat them together on medium speed.
Keep going for 3-4 minutes. Your arm might get tired if you’re doing this by hand. Push through.
What you’re looking for is a pale, fluffy mixture. It should almost double in size. This isn’t just mixing – you’re incorporating air into the batter. That air creates those tender little pockets in the finished bread.
Now crack your eggs.
Add them one at a time. Beat well after each one.
Pour in your vanilla.
The mixture might look weird right now. Kind of curdled or separated. That’s normal. Don’t panic. It’ll come together.
Step 4: Add the Dry Stuff
In your second bowl, whisk together the flour and baking powder.
This step is actually important. Whisking distributes the baking powder evenly. Otherwise you might get random super-fluffy spots and random dense spots.
Add this flour mixture to your butter mixture gradually.
Stir gently. Just until combined.
Now add the milk.
Mix until smooth. But here’s the key – don’t overmix.
A few tiny lumps? Totally fine.
Overmixing develops the gluten in flour. That makes bread tough and chewy. We want soft and tender.
Step 5: Prep Your Apples
Remember those chopped apples?
Grab your third small bowl. Toss the apples with 1 tablespoon sugar and 1 teaspoon cinnamon.
Coat them well.
This does two things. First, it keeps the apples from sinking straight to the bottom of your pan. Second, the sugar pulls out some apple juice, which intensifies the flavor.
Let them sit for a minute while you move to the next step.
Step 6: The Layering Process
This is my favorite part.
Pour half your batter into that greased loaf pan. Use your spatula to spread it out. Get it into all the corners. Make it even.
Now take half your apple mixture. Spoon it over that first layer of batter.
Spread the apples around, but don’t press down yet. They’ll settle on their own.
Here comes the tricky part.
Carefully spread the rest of your batter over the apples. Work gently. You don’t want to disturb the apple layer too much.
Some mixing will happen. That’s actually good. It creates this cool marbled swirl effect.
Top everything with your remaining apples. Now you can press them down a bit. Not hard – just enough so they sink into the batter instead of sitting on top.
Finally, grab that brown sugar and cinnamon mixture you made way back in Step 2.
Sprinkle it over the whole surface.
Be generous. This creates the signature crust.
Step 7: Bake It
Slide that pan into your preheated oven.
Set a timer for 60 minutes.
The bread is done when a toothpick stuck in the center comes out clean. Or with just a few moist crumbs clinging to it.
Watch the top around the 40-minute mark.
If it’s browning too fast, loosely tent some aluminum foil over it. This keeps the top from burning while the inside finishes baking.
I learned this lesson after my first loaf came out with a nearly-black top and a raw center. Not my finest moment.
When your timer goes off, pull the pan out.
Let it cool in the pan for 30 minutes.
I know. I know. You want to eat it right now.
But if you try to remove it too soon, it’ll fall apart. The bread needs time to set up properly.
Use this time to clean up your kitchen. Or make coffee. Or just stare at your beautiful bread and feel proud.
Step 8: The Glaze
While your bread cools, make the glaze.
Small bowl. Powdered sugar. Milk.
Whisk until smooth.
The consistency should be pourable but not watery. Think thick honey.
Too runny? Add more powdered sugar, a tablespoon at a time.
Too thick? Add milk, literally drop by drop.
Once your bread has cooled for 30 minutes, drizzle this glaze all over the top.
I like making zigzag patterns. Makes it look fancy.
The glaze will set as it sits. Creates this beautiful glossy finish.
How to Store This (And Other Important Stuff)
Keeping It Fresh
Let your bread cool completely first.
Then wrap it tight in plastic wrap. Or put it in an airtight container.
Room temperature: Good for 4 days.
Actually, here’s a secret. I think it tastes better on day two. The flavors blend together overnight. The texture gets even softer somehow.
In the fridge: Lasts up to a week when wrapped properly.
Just let slices come to room temp before eating. Or pop one in the microwave for 15 seconds. Brings back that fresh-baked warmth.
Tips I Wish Someone Had Told Me
I’ve made this bread at least 30 times now.
Here’s what I’ve learned:
The butter thing is real. Don’t use cold butter. It won’t cream properly with the sugar. Just won’t. Leave it out for an hour before you start. Or if you’re impatient like me, cut it into small chunks – it softens faster.
Room temperature eggs are better. They blend into batter more smoothly. Forgot to take them out? Put them in a bowl of warm water for 5 minutes. Problem solved.
Flour measuring matters. Don’t scoop your measuring cup directly into the flour bag. You’ll pack in way too much. Instead, spoon flour into your cup, then level it off. This keeps your bread from turning out dry and dense.
I made that flour mistake exactly once. The bread came out like a brick. Live and learn.
How to Serve This Beauty
The possibilities are endless.
For breakfast: Serve it warm with salted butter. The sweet-savory combo is incredible. Sometimes I add a drizzle of honey too.
Afternoon snack: Perfect with hot tea or coffee. Not too sweet. Just right.
Dessert hack: Warm a slice slightly and top with vanilla ice cream. You’re welcome.
Toast it: This changes everything. The edges get crispy. The inside stays soft. The cinnamon flavor intensifies.
Try it. Thank me later.
Your Questions Answered
Can I freeze this bread?
Yes! Absolutely yes.
Wrap it tight in plastic wrap. Then wrap it again in aluminum foil. Double wrapping prevents freezer burn.
Freezes beautifully for up to 3 months.
To thaw: Leave it in the fridge overnight. Then bring to room temp before serving.
I usually freeze individual slices. Makes it easier to grab one whenever I want it.
My loaf pan is 9×5 inches – will that work?
Sure will.
Your bread will be a bit flatter. But equally delicious.
Just check it earlier. Start testing for doneness at the 50-minute mark instead of 60.
Can I use different milk?
Yep.
I’ve successfully used almond milk, oat milk, even coconut milk. All worked fine.
The texture stays moist no matter which milk you choose.
Why did my apples sink to the bottom?
This usually happens for two reasons:
- Your batter was too thin
- Your apple chunks were too big
Coating the apples in that sugar-cinnamon mixture helps a lot. Also make sure your batter is thick enough to support the fruit.
If your apples still sink, don’t stress. The bread will still taste amazing.
How do I know when it’s really done?
The toothpick test works great. Stick one in the center. It should come out clean or with just a few crumbs.
But I also look for these signs:
- Edges pulling away slightly from the pan
- Top springs back when gently pressed
- Internal temp of 200°F if you have a thermometer
When all three happen? It’s done.
Final Thoughts From My Kitchen
This Amish Apple Fritter Bread has earned permanent status in my recipe rotation.
It’s the bread I make when my mom visits. When friends come over. When I need to bring something to a potluck and actually want to impress people.
The combination of soft bread, sweet apples, and warm cinnamon just works. Every single time.
New to baking? This is a great recipe to start with. It’s forgiving. Hard to mess up.
Experienced baker? You’ll appreciate how something so simple can taste so good.
Make it this weekend.
Your house will smell incredible. You’ll have fresh bread for days. And people will think you spent way more effort than you actually did.
That’s a win in my book.
Happy baking!
Amish Apple Fritter Bread
Ingredients
Brown Sugar Topping
- 1/3 cup brown sugar light or dark
- 1 teaspoon ground cinnamon
Bread Batter
- 1/2 cup butter 1 stick, softened
- 2/3 cup granulated sugar
- 2 large eggs room temperature
- 2 teaspoons vanilla extract
- 1 1/2 cups all-purpose flour
- 2 teaspoons baking powder
- 1/2 cup milk whole milk recommended
Apple Mixture
- 2 cups apples chopped (Granny Smith or Honeycrisp recommended)
- 1 tablespoon granulated sugar
- 1 teaspoon ground cinnamon
Glaze
- 1/2 cup powdered sugar
- 1 tablespoon milk plus more as needed
Instructions
- Preheat oven to 350°F. Spray an 8.5 x 4.5 x 2.5-inch loaf pan with cooking spray.
- In a small bowl, whisk together 1/3 cup brown sugar and 1 teaspoon cinnamon. Set aside.
- In a large mixing bowl, cream together the softened butter and 2/3 cup granulated sugar on medium speed for 3-4 minutes until pale and fluffy.
- Add eggs one at a time, beating well after each addition. Add vanilla extract and mix until combined.
- In a separate bowl, whisk together flour and baking powder.
- Add the flour mixture to the butter mixture gradually, stirring gently until just combined. Add 1/2 cup milk and mix until smooth. Do not overmix.
- In a small bowl, toss the chopped apples with 1 tablespoon sugar and 1 teaspoon cinnamon. Coat well.
- Pour half of the batter into the prepared loaf pan and spread evenly. Spoon half of the apple mixture over the batter.
- Carefully spread the remaining batter over the apples. Top with the remaining apple mixture, pressing down slightly.
- Sprinkle the brown sugar and cinnamon topping generously over the entire surface.
- Bake for 60 minutes, or until a toothpick inserted in the center comes out clean or with just a few moist crumbs. If the top browns too quickly after 40 minutes, loosely tent with aluminum foil.
- Let the bread cool in the pan for 30 minutes before removing.
- While the bread cools, whisk together powdered sugar and 1 tablespoon milk in a small bowl until smooth. Adjust consistency by adding more sugar (if too thin) or milk (if too thick).
- Drizzle the glaze over the cooled bread in a zigzag pattern. Let the glaze set before slicing.