This Chicken Coconut Curry has completely transformed my weeknight dinner routine! The combination of creamy coconut milk, aromatic curry spices, and tender chicken creates magic in one pot. I stumbled upon this recipe during a particularly hectic week when I needed something quick yet impressive.
Table of Contents
- Why You’ll Love This Recipe
- Ingredients You’ll Need
- Step-by-Step Instructions
- Serving Suggestions
- Storage Tips
- FAQs

Why This Recipe Works
I’ve made countless curry recipes over the years. This one stands out for several reasons. First, it comes together in just 25 minutes. Second, the flavor profile balances perfectly between creamy and spicy. The coconut milk provides richness while the jalapeños add just enough heat.
The secret lies in the combination of dried basil and fresh cilantro. Most curry recipes skip the basil entirely. I discovered this addition creates unexpected depth. The dried basil melds beautifully with the curry powder during cooking. The fresh cilantro brightens everything at the end.
My Discovery Story
Last month, I hosted a dinner party on short notice. My friend texted at 2 PM asking if she could bring her cousins visiting from Seattle. Of course I said yes! Then panic set in. I had exactly three hours to prepare dinner for eight people.
I rummaged through my pantry and found two cans of coconut milk. My freezer held chicken thighs I’d bought on sale. Fresh herbs sat in my crisper drawer. Everything clicked into place. This curry was born from necessity but became a beloved staple.
What Makes This Curry Special
The bone-in chicken thighs are non-negotiable for me. They stay incredibly juicy during cooking. The bones add extra flavor to the sauce. Plus, they’re more affordable than boneless cuts. I always remove the skin first though. It prevents excess greasiness in the final dish.
Yellow curry powder brings earthy warmth without overwhelming heat. I use chili powder for an extra kick. You can adjust this based on your preference. Start with half a teaspoon if you’re sensitive to spice. You can always add more later.
The jalapeños deserve special mention. Removing the seeds keeps the heat manageable. My kids actually enjoy this curry, which says something! The peppers contribute flavor beyond just spiciness. They add a fresh, green note that complements the coconut.
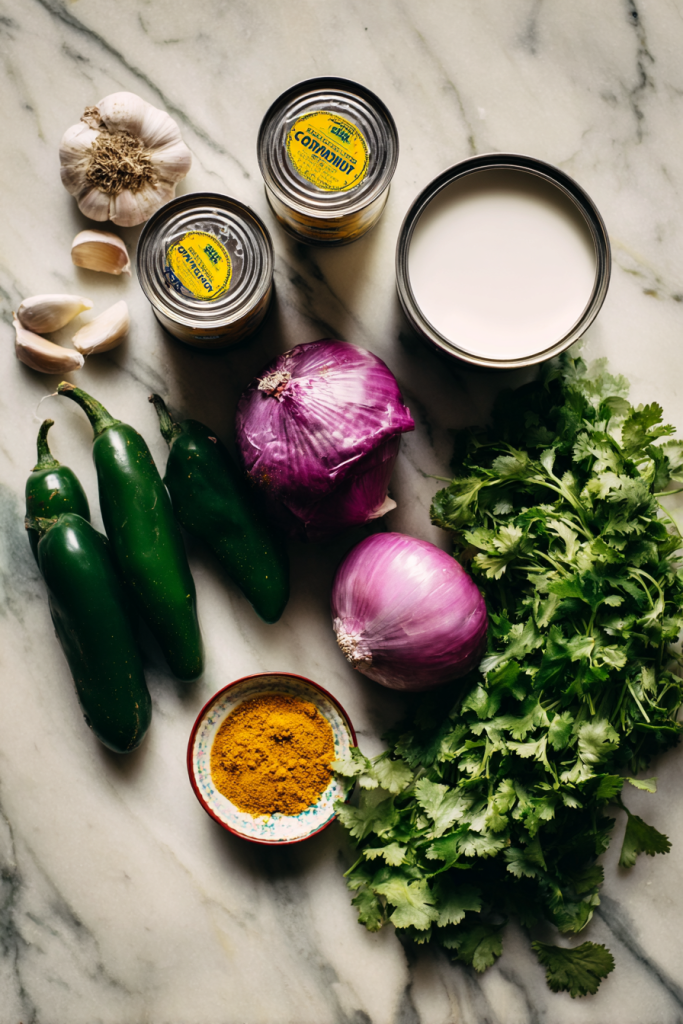
Ingredients Overview
| Ingredient | Quantity | Notes |
|---|---|---|
| Chicken thighs (bone-in, skin-on) | 6 pieces (about 2.5 lbs) | Skin removed before cooking |
| Salt | 2 teaspoons + more for seasoning | Divided use |
| Black pepper | 3/4 teaspoon + more for seasoning | Freshly ground preferred |
| Oil | 1 teaspoon | Any neutral cooking oil |
| Coconut milk | 2 cans (13.5 oz each) | Regular or lite works well |
| Dried basil leaves | 2 tablespoons | Don’t substitute fresh |
| Yellow curry powder | 1.5 tablespoons | Medium heat variety |
| Chili powder | 1/2 to 3/4 teaspoon | Adjust to taste |
| Red onion | 1 large | Chopped |
| Garlic | 8 cloves | Minced |
| Jalapeños | 2 | Seeded and finely chopped |
| Cornstarch | 1 tablespoon | For thickening |
| Cold water | 1 tablespoon | Mix with cornstarch |
| Fresh ginger | 1 teaspoon | Grated or minced |
| Fresh cilantro | 1/3 to 1/2 cup | Chopped, for finishing |
Pro tip: Buy chicken thighs when they’re on sale and freeze them. They thaw quickly in cold water. This makes the recipe even more budget-friendly.
Prep Time: 10 minutes | Cook Time: 15 minutes | Total Time: 25 minutes
Servings: 4 | Difficulty: Easy
Detailed Instructions & Cooking Process
Preparing Your Ingredients
Before you start cooking, prep everything. This French technique called “mise en place” makes cooking smoother. Mince your garlic cloves first. I use a garlic press to save time. Chop the red onion into small, even pieces.
Seed your jalapeños by slicing them lengthwise. Use a small spoon to scrape out the seeds and white membranes. Wash your hands thoroughly afterward! I learned this lesson the hard way. Never touch your eyes after handling jalapeños, even if you think you washed well enough.
Grate the fresh ginger using a microplane or fine grater. The small pieces distribute more evenly throughout the sauce. Fresh ginger adds brightness that ground ginger can’t match. If you’re in a pinch, use 1/2 teaspoon ground ginger instead.
The Searing Process
Remove the chicken skin using your fingers. It peels off easily from thighs. You can also use a serrated knife if needed. Season both sides of the chicken generously with salt and pepper.
Heat your skillet to medium-high. Add the teaspoon of oil. Wait until the oil shimmers slightly. This indicates it’s hot enough. Add three chicken thighs to the pan. Don’t crowd them or they’ll steam instead of sear.
Let the chicken cook undisturbed for two to three minutes. Resist the urge to move them around! The caramelization creates incredible flavor. Flip each thigh and brown the other side. Transfer to a plate and repeat with remaining thighs.
This searing step takes maybe six minutes total. It’s absolutely worth it though. The golden-brown crust adds depth you can’t achieve otherwise. The fond left in the pan also enriches the sauce later.
Building the Curry Base
Now comes the easy part! Pour both cans of coconut milk into your pot or Dutch oven. Add the dried basil, salt, pepper, curry powder, and chili powder. Stir everything together until the spices dissolve.
Add the chopped red onion, minced garlic, and jalapeños. These aromatics infuse the sauce with flavor. The onion softens and nearly melts into the curry. The garlic becomes mellow and sweet. The jalapeños distribute their heat evenly throughout.
Place the seared chicken thighs into the sauce. Make sure they’re mostly submerged. The sauce should come about halfway up the sides. Bring everything to a gentle simmer over medium heat.
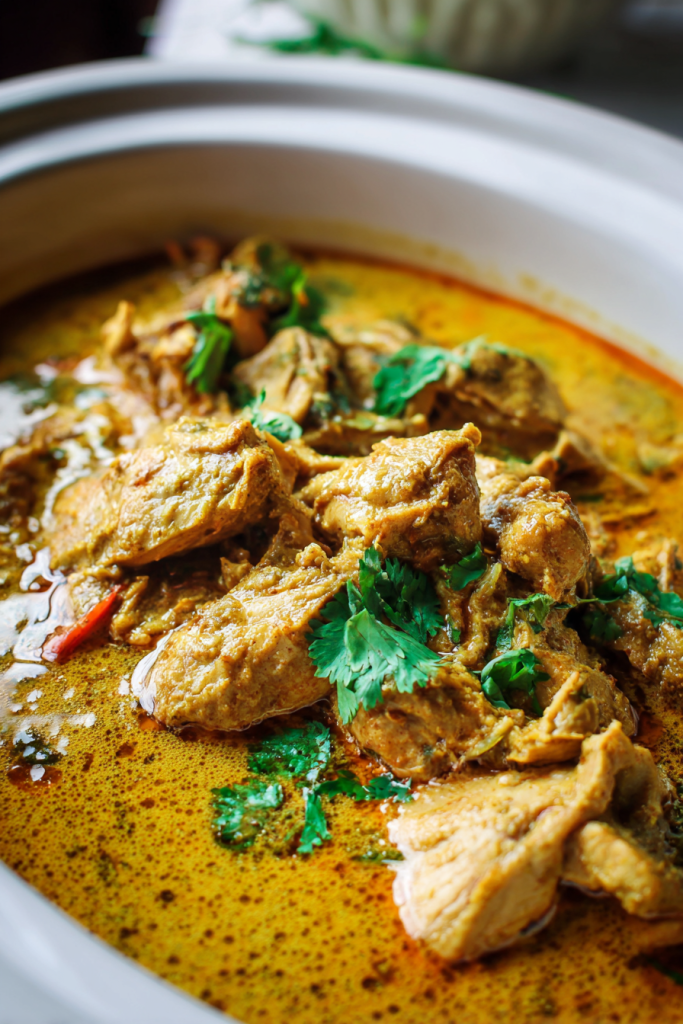
The Cooking Phase
Reduce heat to medium-low. Cover the pot and let everything simmer gently. The chicken needs about 15 minutes to cook through completely. You’ll know it’s done when the meat reaches 165°F internally.
During this time, the sauce reduces slightly. The flavors meld together beautifully. The coconut milk mellows the spices. The curry powder blooms and becomes more aromatic. Your kitchen will smell absolutely amazing.
Check the chicken occasionally. Give the sauce a gentle stir to prevent sticking. The bone-in thighs take slightly longer than boneless cuts. They’re worth the extra few minutes though. The meat becomes incredibly tender.
Finishing the Sauce
Remove the chicken pieces to a clean plate. Add the grated fresh ginger to the sauce. Stir it in thoroughly. The ginger adds a final layer of brightness and complexity.
Mix the cornstarch with cold water in a small bowl. This creates a slurry that thickens the sauce. Stir the slurry into the simmering curry. Keep stirring for about one minute. The sauce will thicken noticeably.
The cornstarch technique works better than flour here. It creates a glossy, smooth texture. The sauce should coat the back of a spoon nicely. If it’s too thick, add a splash of water. If it’s too thin, simmer uncovered for a few more minutes.
Shredding and Final Assembly
Use two forks to shred the chicken into bite-sized pieces. The meat should pull apart easily. If it resists, it needs more cooking time. Return the shredded chicken to the pot. Stir everything together gently.
Let the curry simmer for a final two minutes. This allows the chicken to reabsorb some sauce. The flavors combine one last time. Taste and adjust seasoning if needed. Sometimes I add a pinch more salt or a squeeze of lime juice.
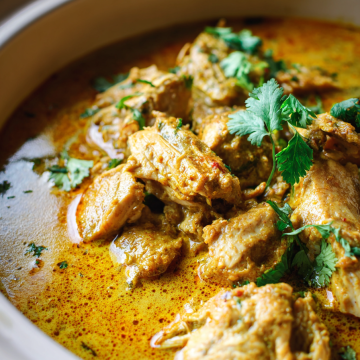
Remove from heat and stir in the fresh cilantro. Reserve some for garnish if you like. The cilantro adds freshness that balances the richness. Don’t skip this step! It makes a noticeable difference.
Pro tip: The curry tastes even better the next day. The flavors have more time to develop. Make it ahead for meal prep or entertaining.
Serving, Storage & FAQs
How to Serve This Curry
I always serve this curry over steamed basmati rice. The fluffy rice soaks up the incredible sauce. Jasmine rice works wonderfully too. For a low-carb option, try cauliflower rice. It holds up surprisingly well.
Naan bread is my absolute favorite accompaniment. You can buy it at most grocery stores now. Warm it in the oven for a few minutes. Use it to scoop up every last bit of sauce. The combination is simply heavenly.
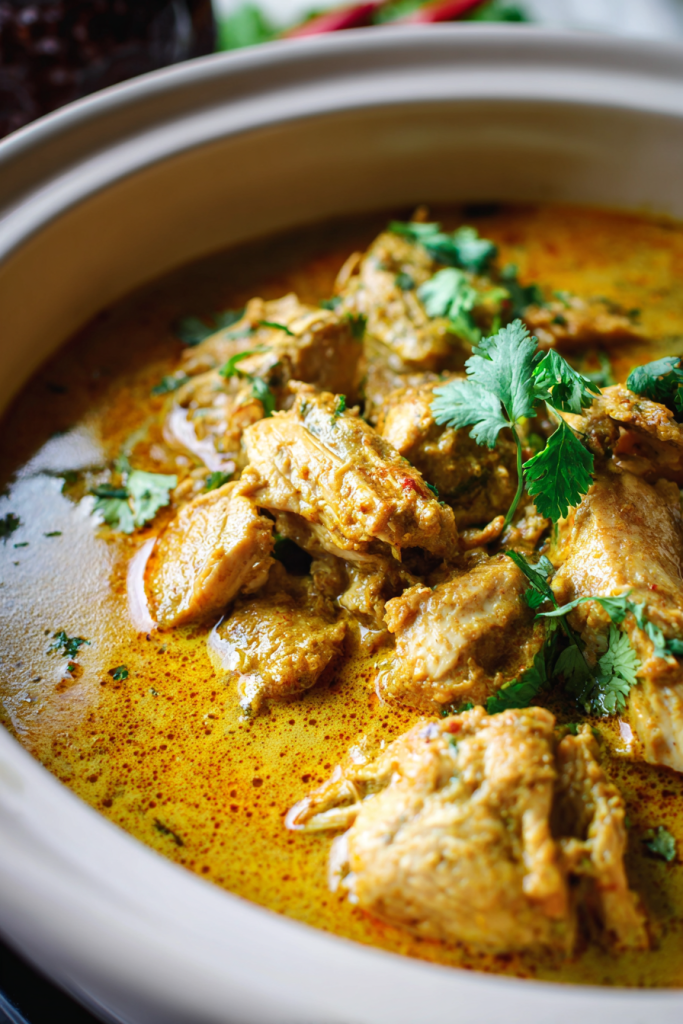
Add some fresh vegetables on the side for crunch. I love serving cucumber slices with a yogurt dipping sauce. Cherry tomatoes or a simple green salad work well too. The cool, crisp vegetables contrast beautifully with the warm, creamy curry.
For extra flair, garnish with additional cilantro and lime wedges. The lime juice brightens the entire dish. A sprinkle of red pepper flakes adds visual appeal. Sometimes I add toasted coconut flakes for texture.
Storing Your Leftovers
Leftover curry keeps beautifully in the refrigerator. Transfer it to an airtight container once cooled. It will stay fresh for three to four days. The flavors actually deepen over time.
To reheat, use the stovetop for best results. Warm it gently over low heat, stirring occasionally. Add a splash of water or coconut milk if needed. The sauce sometimes thickens in the fridge. Microwaving works fine too, though the texture isn’t quite as good.
This curry freezes exceptionally well! Pour cooled curry into freezer-safe containers. Leave some headspace for expansion. It keeps for up to three months frozen. Thaw overnight in the refrigerator before reheating.
When reheating from frozen, I use the stovetop method. It takes about 15 minutes on low heat. Stir frequently to ensure even heating. The chicken stays tender and the sauce maintains its creamy texture.
Recipe Variations
Want to switch things up? Try these modifications. Swap chicken thighs for boneless breasts if preferred. Reduce cooking time to ten minutes. The meat won’t be quite as flavorful but still delicious.
Add vegetables for extra nutrition. Bell peppers, snap peas, or spinach work great. Stir them in during the last five minutes of cooking. They’ll soften perfectly without becoming mushy.
For a Thai-inspired version, substitute Thai basil for dried basil. Add lemongrass and kaffir lime leaves. Fish sauce instead of extra salt creates authentic flavor. These small changes transform the dish completely.
Vegetarians can use chickpeas or tofu instead of chicken. Skip the searing step for chickpeas. For tofu, press it well and sear until golden. Both options absorb the curry sauce beautifully.
Frequently Asked Questions
Can I use chicken breasts instead of thighs?
Yes, you can substitute chicken breasts. Use boneless, skinless breasts cut into chunks. Reduce the cooking time to about ten minutes. Check that the internal temperature reaches 165°F. Breasts tend to dry out more easily than thighs. They also provide less flavor. If using breasts, consider adding a tablespoon of butter for richness.
Is this curry very spicy?
The heat level is moderate and adjustable. Removing jalapeño seeds keeps it family-friendly. My kids eat this without complaints! Start with half a teaspoon of chili powder. Taste the sauce before adding chicken. You can always increase the heat later. Serve hot sauce on the side for those who want more kick.
Can I make this ahead of time?
Absolutely! This curry is perfect for meal prep. Make it up to two days in advance. Store it in the refrigerator in an airtight container. The flavors improve as they sit. Reheat gently on the stovetop before serving. Add fresh cilantro just before eating for the best flavor.
What can I substitute for coconut milk?
Heavy cream works as a substitute, though the flavor changes significantly. Use the same amount as the coconut milk. Cashew cream provides a dairy-free alternative with similar richness. You could also try combining chicken broth with a few tablespoons of tahini. None perfectly replicate coconut milk’s unique sweetness though.
Why remove the chicken skin?
Chicken skin releases excess fat during cooking. This can make the curry too greasy. The skin also doesn’t crisp up in the simmering liquid. It becomes flabby and unappealing. Removing it keeps the sauce cleaner and more pleasant. You still get plenty of flavor from the bone-in thighs.
Final Thoughts
This Chicken Coconut Curry has earned a permanent spot in my dinner rotation. It’s quick enough for busy weeknights yet impressive for company. The balance of flavors never fails to satisfy.
The best part is its flexibility. Adjust the spice level to your preference. Add your favorite vegetables. Serve it however you like. The basic recipe provides an excellent foundation for experimentation.
I hope you love this curry as much as my family does. It brings warmth and comfort to our table every time. The aromatic spices and creamy sauce create something truly special.
Make this recipe your own! Try different garnishes or serving styles. Share it with friends and family. There’s something magical about a homemade curry that brings people together.
Pro tip: Double the recipe and freeze half. Future you will be incredibly grateful. Having homemade curry ready in the freezer is like having a secret weapon for busy days.
Happy cooking! May your kitchen smell amazing and your belly be full!
Recipe Card Summary
Chicken Coconut Curry
A quick and flavorful one-pot meal featuring tender chicken in a creamy, aromatic curry sauce.
Prep: 10 min | Cook: 15 min | Total: 25 min | Serves: 4
Ingredients: Chicken thighs, coconut milk, curry powder, jalapeños, red onion, garlic, ginger, basil, cilantro, cornstarch
Method: Sear chicken, simmer in coconut curry sauce, thicken, shred, and serve.
Best served with: Basmati rice and naan bread
Storage: Refrigerate 3-4 days or freeze up to 3 months
Chicken Coconut Curry
Ingredients
- 6 chicken thighs bone-in skin-on (about 2.5 lbs), skin removed
- 2 teaspoons salt plus more for seasoning
- 3/4 teaspoon black pepper plus more for seasoning
- 1 teaspoon oil any neutral cooking oil
- 2 cans coconut milk 13.5 oz each
- 2 tablespoons dried basil leaves
- 1.5 tablespoons yellow curry powder
- 1/2 to 3/4 teaspoon chili powder adjust to taste
- 1 large red onion chopped
- 8 cloves garlic minced
- 2 jalapeños seeded and finely chopped
- 1 tablespoon cornstarch
- 1 tablespoon cold water
- 1 teaspoon fresh ginger grated or minced
- 1/3 to 1/2 cup fresh cilantro chopped
Instructions
- Prep the Ingredients
- Mince garlic, chop red onion, seed and chop jalapeños, and grate fresh ginger. Remove skin from chicken thighs and season both sides generously with salt and pepper.
- Sear the Chicken
- Heat oil in a large skillet over medium-high heat until shimmering. Add 3 chicken thighs and sear for 2-3 minutes per side until golden brown. Transfer to a plate and repeat with remaining thighs.
- Build the Curry Base
- Pour both cans of coconut milk into a large pot or Dutch oven. Add dried basil, 2 teaspoons salt, 3/4 teaspoon pepper, curry powder, and chili powder. Stir until spices dissolve. Add chopped onion, minced garlic, and jalapeños.
- Cook the Chicken
- Place seared chicken thighs into the sauce, ensuring they’re mostly submerged. Bring to a gentle simmer over medium heat, then reduce to medium-low. Cover and simmer for 15 minutes until chicken reaches 165°F internally.
- Thicken the Sauce
- Remove chicken to a plate. Add grated ginger to the sauce and stir. Mix cornstarch with cold water to create a slurry. Stir the slurry into the simmering curry and cook for 1 minute, stirring constantly, until sauce thickens.
- Shred and Combine
- Use two forks to shred the chicken into bite-sized pieces. Return shredded chicken to the pot and stir. Simmer for 2 more minutes. Taste and adjust seasoning if needed.
- Finish and Serve
- Remove from heat and stir in fresh cilantro. Serve hot over basmati rice or with naan bread. Garnish with extra cilantro and lime wedges if desired.
Notes
Heat Level: Start with 1/2 teaspoon chili powder for mild heat. Remove jalapeño seeds for family-friendly spice level.
Storage: Refrigerate in an airtight container for 3-4 days. Freezes well for up to 3 months.
Reheating: Warm gently on stovetop over low heat. Add a splash of coconut milk or water if sauce has thickened.
Variations: Add bell peppers, snap peas, or spinach in the last 5 minutes of cooking. Substitute chickpeas or tofu for a vegetarian version.
Make Ahead: Flavors improve after sitting. Prepare up to 2 days in advance and add fresh cilantro just before serving.